User and Member Management
Effective user management is fundamental to maintaining secure, organized, and collaborative organizations. This comprehensive guide covers how to invite new users, manage pending invitations, configure role assignments, and modify member permissions within your Safedevops.app organization. Proper user management ensures the right people have appropriate access levels while maintaining security and compliance.
Organization Administrator (OrgAdmin) Role: The user who creates an organization automatically receives the OrgAdmin role, which grants comprehensive permissions to manage users, roles, billing, and organization settings.
Critical Requirement: Every organization must maintain at least one OrgAdmin at all times. The system prevents removal of the last administrator to ensure organizational continuity and access recovery.
To learn more about roles and permissions, see the Managing Role Permissions guide.
User Management Interface
The user management system provides a centralized interface for overseeing all aspects of organizational membership, from initial invitations through ongoing role management and eventual member removal.
1. Accessing User Management
Navigate to the user management interface through your organization settings:
- Organization Settings: Access through the main navigation menu under "Organization" → "Settings".
- Users & Permissions Tab: Select the "Users & Permissions" tab to view the management interface.
- Dual View System: The interface is organized into "Invitations" and "Members" tabs for clear workflow separation.
- Permission Verification: Ensure you have OrgAdmin privileges to access all management features.
[Screenshot showing the navigation path to user management settings.]
2. Understanding the Interface Layout
The user management interface provides comprehensive oversight capabilities:
- Invitations Tab: View and manage all pending invitations with the ability to resend or cancel invites.
- Members Tab: Complete list of active organization members with role editing and removal capabilities.
- Search and Filter: Quickly locate specific users or invitations using built-in search functionality.
- Bulk Operations: Perform actions on multiple users simultaneously for efficient administration.
- Status Indicators: Visual indicators show invitation status, member activity, and role assignments.
[Screenshot of the main user management interface showing both tabs and member listings.]
Inviting New Members
The invitation process ensures secure onboarding of new team members while maintaining proper role assignment and access control. Only Organization Administrators can extend invitations, and invited users receive secure email notifications with organization join links.
1. Initiating the Invitation Process
Begin the invitation workflow from the user management interface:
- Invitations Tab: Navigate to the "Invitations" tab to access invitation management.
- Invite New User Button: Click the prominent "Invite New User" button to open the invitation form.
- Permission Check: Verify you have OrgAdmin permissions required for sending invitations.
- Email Integration: Ensure your organization's email settings are configured for invitation delivery.
[Screenshot showing the Invitations tab with the "Invite New User" button highlighted.]
2. Configuring Invitation Details
Complete the invitation form with comprehensive user information:
- Email Address: Enter the precise email address of the person you wish to invite (Required).
- Organization Role: Select the appropriate organizational role (OrgAdmin, Member, etc.) based on their responsibilities.
- SAFe® Role Assignment: Optionally assign specific SAFe® program roles (RTE, Product Manager, System Architect, etc.).
- Team Assignment: Pre-assign the user to specific teams if their role is already determined.
- Custom Message: Include a personalized welcome message to provide context about the invitation.
Best Practice: Include information about the organization's purpose and the invitee's expected role in your custom message to provide context and improve acceptance rates.
[Screenshot of the complete invitation form with all fields visible and populated.]
3. Sending and Tracking Invitations
Complete the invitation process and monitor its progress:
- Send Invitation: Click "Send Invite" to dispatch the invitation email to the recipient.
- Confirmation Feedback: Receive immediate confirmation that the invitation was successfully sent.
- Status Tracking: Monitor invitation status (Pending, Accepted, Expired) in the Invitations tab.
- Resend Options: Resend invitations if the original email was not received or has expired.
- Cancellation: Cancel pending invitations if circumstances change before acceptance.
Managing Existing Members
Ongoing member management involves role updates, permission adjustments, and member removal when necessary. The Members tab provides comprehensive tools for maintaining optimal team composition and access control.
1. Member Overview and Information
The Members tab displays comprehensive member information for effective management:
- Member Directory: Complete list of all active organization members with essential details.
- Role Indicators: Clear visual indicators showing each member's organizational and SAFe® roles.
- Activity Status: View member activity levels and last login information.
- Team Associations: See which teams each member belongs to for organizational context.
- Contact Information: Access member contact details for direct communication when needed.
[Screenshot of the Members tab showing the member directory with role indicators and team associations.]
2. Modifying Member Roles and Permissions
Adjust member roles and permissions to reflect changing organizational needs:
- Role Editing: Click the edit icon next to any member's name to modify their organizational role.
- Permission Promotion: Promote regular members to OrgAdmin status for expanded administrative capabilities.
- Permission Demotion: Reduce OrgAdmin members to regular member status while maintaining safety checks.
- SAFe® Role Updates: Modify SAFe® program roles to reflect changes in responsibilities or team structure.
- Bulk Role Changes: Apply role changes to multiple members simultaneously for organizational restructuring.
Security Consideration: Role changes take effect immediately. Ensure you have proper authorization before modifying member permissions, especially when granting or removing administrative access.
[Screenshot showing the role editing interface with dropdown options for different roles.]
3. Member Removal and Offboarding
Remove members from the organization when they leave the team or no longer require access:
- Removal Process: Click the removal icon next to a member's name to initiate the removal process.
- Confirmation Dialog: Review the confirmation dialog to understand the impact of member removal.
- Work Item Transfer: Ensure work items and responsibilities are transferred to other team members before removal.
- Access Revocation: Confirm that all organizational access is immediately revoked upon removal.
- Data Retention: Understand that historical contributions and audit trails are preserved for compliance.
Best Practice: Before removing a member, review their active work items, team assignments, and any ongoing responsibilities to ensure smooth transition and continuity.
Advanced User Management
Leverage advanced features to optimize user management efficiency and maintain organizational security standards.
Bulk Operations and Administrative Efficiency
Use bulk operations for efficient management of large user bases:
- Multi-select Users: Select multiple users for simultaneous role changes or removals.
- Bulk Invitations: Send invitations to multiple users at once using CSV import functionality.
- Role Templates: Create and apply role templates for consistent permission assignment.
- Automated Workflows: Set up automated workflows for common user management tasks.
- Audit Trails: Review comprehensive audit logs of all user management activities for compliance.
Security and Compliance Features
Maintain security standards and compliance requirements through advanced user management features:
- Access Reviews: Conduct regular access reviews to ensure appropriate permission levels.
- Role Segregation: Implement proper separation of duties through role-based access control.
- Session Management: Monitor and manage active user sessions for security purposes.
- Compliance Reporting: Generate reports for compliance audits and security assessments.
- Emergency Access: Maintain emergency access procedures for critical situations.
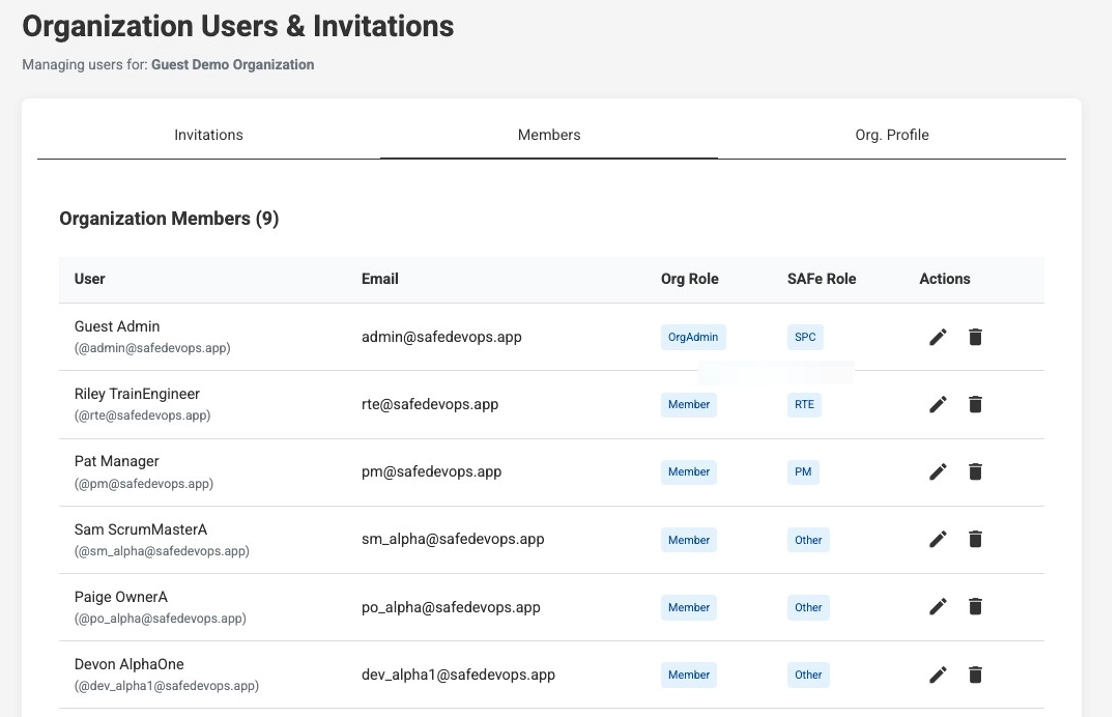
Managing Members and Invitations
The user management screen is organized into two main tabs: Invitations and Members. As an OrgAdmin, you have full control over both.
The "Members" Tab
The "Members" tab provides a complete list of all users who have successfully joined your organization. On this screen, you can:
- Edit a member's role by clicking the small pen icon. This allows you to promote a member to OrgAdmin or demote an OrgAdmin to a regular member.
- Remove a member from the organization entirely by clicking the small trash icon.
The "Invitations" Tab
The "Invitations" tab is used exclusively for managing invites that have been sent but not yet accepted. Here, you can see all pending invitations and revoke any that are no longer needed by clicking the Revoke icon.
Tip: Resending an Invitation
If a user hasn't received their invitation or the link has expired, you can effectively resend it. To do this, first Revoke the original pending invitation from the "Invitations" tab, and then create and send a new one.
Managing Your Organization Invitations
When you receive invitations to join organizations, you can manage them directly from multiple locations in the application without needing to access email links. This streamlined approach provides convenient access to handle all your pending invitations.
Invitation Management Locations
You can view and manage your pending invitations from several convenient locations:
- Your Organizations Page: The primary location displaying all your organizations and pending invitations.
- Create Organization Page: An invitation banner appears here, allowing you to join existing organizations before creating new ones.
- Consistent Interface: The invitation management interface is identical across all locations for familiarity.
- Real-time Updates: Invitation status updates in real-time across all pages when you take action.
Viewing Pending Invitations
The invitation banner displays comprehensive information about your pending invitations:
- Invitation Banner: A blue-accented banner appears showing the number of pending invitations.
- Invitation Details: Each invitation displays the organization name, who invited you, and your assigned role.
- Role Information: Both organizational roles (OrgAdmin, Member) and SAFe® program roles are clearly indicated.
- Direct Actions: Accept or decline invitations directly from this interface without navigating elsewhere.
- Contextual Messaging: Helpful information about joining existing organizations or creating new ones.
[Screenshot showing the invitation banner with pending organization invitations listed.]
Accepting Organization Invitations
Accept invitations to join organizations directly from the banner:
- Accept Button: Click the green "Accept" button next to any invitation to join that organization.
- Immediate Processing: The system processes the acceptance immediately with visual feedback.
- Success Confirmation: Receive clear visual confirmation when the invitation is successfully accepted.
- Automatic Refresh: The organization list automatically refreshes to include your new organization.
- Role Assignment: You are automatically assigned the roles specified in the invitation.
Tip: After accepting an invitation, the new organization will appear in your organization list and you can immediately switch to it if needed.
Declining Organization Invitations
Decline invitations that are no longer relevant or appropriate:
- Decline Button: Click the "Decline" button to reject an invitation.
- Permanent Action: Declining an invitation removes it permanently from your pending list.
- No Account Impact: Declining invitations does not affect your existing organization memberships.
- Re-invitation Possible: Organization administrators can send new invitations if circumstances change.
- Clean Interface: Declined invitations are immediately removed from the banner for a clean interface.
Important: Once you decline an invitation, it cannot be recovered. You would need to request a new invitation from the organization administrator.
Working with Multiple Organizations
A single Safedevops.app user account can be a member of multiple organizations. This is common for consultants, contractors, or users who are part of different business units. When a user accepts an invitation, they join that organization without needing to create a new account.
Switching Between Organizations
If you are a member of more than one organization, you can easily switch between them from the "Your Organizations" page. This page displays a card for each organization you belong to.
Each card shows the organization's name, your role within it, and the current subscription plan. To switch your active context, simply click the "Switch to this organization" button on the desired organization's card. The application will reload, and you will be operating within the newly selected organization.
Role and Permission Context
Your roles and permissions are specific to each organization. For example, you might be an OrgAdmin in one organization and a Developer in another. Your access rights are determined by the roles assigned to you within the currently active organization.